Many homeowners seek to enhance their spaces with stylish and durable vinyl flooring. Achieving a professional-looking installation requires not only the right techniques but also the proper tools. In this guide, you will discover necessary tips and tools that will empower you to complete your vinyl flooring project with confidence and precision, giving your home that polished and refined appearance you desire.
Understanding Vinyl Flooring
A vinyl flooring installation can enhance your space with durability and style. Known for its versatility, vinyl comes in various designs that mimic natural materials while being resistant to water and scratches. This makes it an ideal choice for high-traffic areas and homes with pets. Its easy maintenance and affordability further contribute to its popularity among homeowners.
Types of Vinyl Flooring
Assuming you are exploring vinyl flooring options, you will find several types that suit different needs:
| Luxury Vinyl Plank (LVP) | Offers the look of hardwood with added durability. |
| Luxury Vinyl Tile (LVT) | Replicates the appearance of ceramic or stone tiles. |
| Sheet Vinyl | Ideal for large spaces and minimizes seams. |
| Vinyl Composite Tile (VCT) | Robust and budget-friendly, needing a wax finish. |
| Peel and Stick Vinyl | Easy to install, perfect for DIY enthusiasts. |
Thou should select the type that aligns best with your needs and budget.
Factors to Consider Before Installation
Some important factors to consider before your vinyl flooring installation include:
- Subfloor condition
- Moisture levels in your space
- Your preferred style and design
- Flooring thickness for comfort
- Installation method that best suits you
After evaluating these aspects, you’ll be better prepared for the installation process.
Another consideration involves the environment of the area where you plan to install the vinyl flooring. Assessing factors such as sunlight exposure and humidity levels can affect your choice. Additionally, consider the usage rate of the floor, as areas with heavier foot traffic may require a more durable option:
- Traffic level in the room
- Room temperature and humidity
- Maintenance requirements
- Design preferences
- Installation timeframe
After careful consideration, you can confidently proceed with your vinyl flooring installation, ensuring it fits perfectly with your lifestyle and home vision.
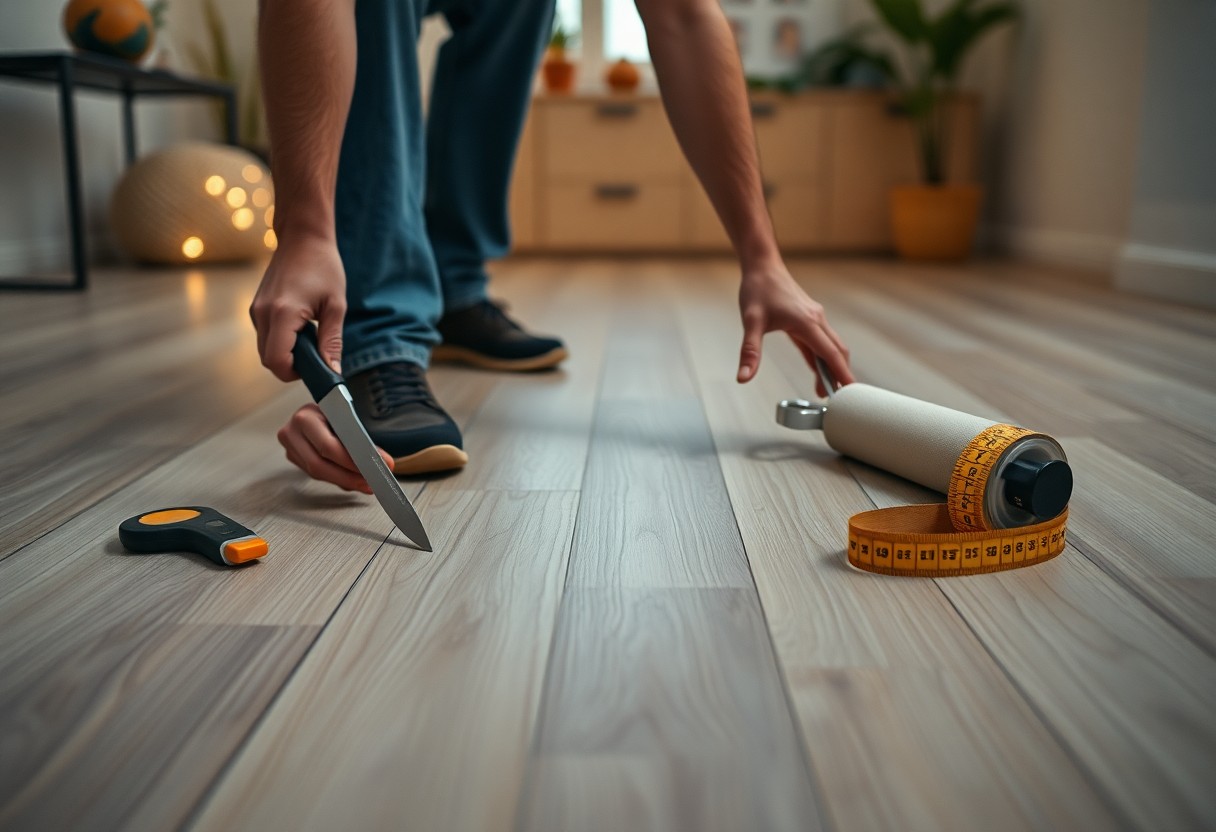
Essential Tools for Installation
One of the keys to a professional-looking vinyl flooring installation is having the right tools on hand. Investing in the necessary tools not only simplifies the process but also enhances the overall quality of your work. From cutting tools to adhesives, knowing what to use will set you up for success and ensure a durable and aesthetically pleasing result.
Cutting Tools
Cutting tools are an indispensable part of your installation toolkit. A quality utility knife, alongside a straight edge and a cutting mat, will allow you to make precise cuts in your vinyl flooring. Additionally, a vinyl tile cutter can be handy for larger areas, saving you time and effort while achieving clean, straight edges.
Adhesive and Installation Supplies
You must also consider the right adhesive and installation supplies to secure your vinyl flooring effectively. Selecting the appropriate adhesive for your specific type of vinyl is necessary for a strong bond that lasts. Common options include pressure-sensitive adhesives for peel-and-stick tiles and waterproof glue for sheet vinyl. You should also have a trowel or roller for application, as well as a measuring tape and spacers for accurate placement. These supplies will help you achieve a seamless finish, ensuring your installation looks professional and holds up over time.
The right adhesive plays a pivotal role in your vinyl flooring’s longevity and performance. For instance, pressure-sensitive adhesives are perfect for floating installations, allowing easy removal and replacement when necessary. If you’re using glue-down vinyl, a strong and suitable adhesive will create a secure bond that not only reduces movement but also protects against moisture. Make sure to follow the manufacturer’s guidelines when applying to ensure optimal results, and take your time to achieve a strong, lasting installation.
Preparing the Subfloor
You need to ensure your subfloor is properly prepared for a successful vinyl flooring installation. This means addressing any issues such as cleaning, leveling, and moisture to create a stable surface. A well-prepped subfloor not only supports your flooring but also enhances its lifespan and aesthetic appeal.
Cleaning and Leveling the Subfloor
An effective installation begins with a clean and level subfloor. Start by sweeping and vacuuming to remove dust and debris. Then, inspect the surface for any low spots or imperfections, filling them with a leveling compound as necessary. Having a flat, smooth surface is imperative for preventing future buckling or loosening of your vinyl flooring.
Moisture Testing
Clearly assessing moisture levels in your subfloor is vital to prevent damage to your vinyl flooring. High moisture can lead to mold and affect the adhesive. Performing moisture tests helps you make informed decisions about installation methods and materials needed for your specific environment.
With a simple moisture test, you can identify potential problems before laying down your vinyl flooring. Use a moisture meter or plastic sheet test to measure moisture levels in concrete or wood subfloors. Ideally, the moisture content should be below 4% for wood and 3% for concrete. If your measurements exceed these levels, it’s wise to implement moisture mitigation strategies before proceeding with installation.
Installation Techniques
All successful vinyl flooring installations hinge on adopting the right installation techniques. These methods ensure not only aesthetic appeal but also durability and longevity. Proper handling and placement are important, as they affect the overall outcome of your project. By following industry-standard practices, you can achieve a professional finish that enhances the beauty of your space.
Layout Planning
Little attention to layout planning can save you time and effort during installation. Begin by measuring your room accurately and marking reference lines, which will help you maintain alignment and consistency throughout the installation process. Consider the natural light direction and any existing baseboards to create a visually appealing design that flows seamlessly.
Cutting and Fitting Vinyl Planks
If you’re aiming for precision in your installation, cutting and fitting vinyl planks accurately is where it counts. Ensure you measure your spaces carefully and mark where cuts will be needed, using a straight edge as a guide.
This phase of installation requires the right tools, such as a utility knife and a straight edge, to deliver clean cuts. Always make sure your planks lay flat and snugly fit together, avoiding gaps that could detract from the final appearance. Don’t hesitate to use a jigsaw for tricky corners or irregular shapes, ensuring each section adapts perfectly to your unique space.
Finishing Touches
For a truly polished vinyl flooring installation, focus on the finishing touches that enhance both aesthetics and functionality. Properly executing these final steps can elevate your flooring project, ensuring it looks professional and lasts longer. Attention to detail is key, so don’t rush through these important stages.
Trimming and Edging
With precise trimming and edging, you can achieve clean lines that make your vinyl flooring stand out. Utilize a sharp utility knife and straightedge to make accurate cuts along the edges of walls or other fixtures. This attention to detail will give your installation a seamless and refined appearance.
Cleaning and Maintenance
Trimming the excess vinyl is only part of the task; proper cleaning and maintenance will ensure your flooring remains in top condition. After installation, make sure to remove any dust or debris with a soft broom or vacuum. Avoid harsh cleaning agents; instead, use a gentle solution with warm water and a soft mop to keep your floors looking pristine.
For instance, regular maintenance not only helps preserve the shine of your vinyl floors but also extends their longevity. Make it a habit to sweep or vacuum your flooring weekly to eliminate dirt and grit, which can wear down the surface over time. Additionally, placing mats at entry points can minimize the amount of debris that makes its way onto your floors. Implementing these simple cleaning routines will help you maintain a stunning and professional look for years to come.
Tips for a Flawless Finish
Keep your installation looking pristine by following these tips:
- Always acclimate your vinyl planks in the installation space for 48 hours.
- Use appropriate underlayment for added comfort and noise reduction.
- Ensure subfloor is clean, dry, and level before installation.
- Apply pressure evenly when rolling out the vinyl to prevent bubbles.
Recognizing these steps will lead to a flawless finish that enhances your space.
Common Mistakes to Avoid
Even experienced DIYers can overlook simple details that lead to problems. Avoid using old adhesive or installing over dirt and debris. Never rush the acclimation period since temperature and humidity can affect vinyl performance. Skipping the subfloor preparation is another misstep that can compromise your installation.
Tricks for Professional Results
The right techniques can transform your DIY project into a professional-grade install. Start by investing in a high-quality cutting tool for precise slices and a straight edge to ensure clean lines. Use a roller or a heat gun to eliminate wrinkles and achieve a seamless look.
Professional results rely on attention to detail and the right techniques. Utilize a straightedge for precise cuts, and always double-check your measurements before making a slice. Applying a heat gun gently can smoothen out any minor imperfections, ensuring a more cohesive design. Additionally, consider installing baseboards or trim to complete the look, hiding any edges and giving your flooring a polished appearance.
To wrap up
Hence, by utilizing the key techniques and tools outlined, you can achieve a professional-looking vinyl flooring installation that enhances the aesthetic of your space. From proper surface preparation to precise cutting and seamless fitting, each step plays a vital role in ensuring a flawless outcome. Investing in high-quality materials and advanced tools will not only streamline your installation process but also guarantee durability and long-lasting appeal. With practice and attention to detail, your vinyl flooring project will reflect your commitment to quality craftsmanship.