
Laying the Groundwork: What You Need to Know
Subfloor Preparation
Before laying vinyl flooring, ensure the subfloor is clean, dry, and structurally sound. Any uneven spots should be leveled with a floor patching compound; imperfections larger than 1/8 inch can lead to issues over time. If you’re installing over concrete, conduct a moisture test; excessive moisture can compromise your flooring. Aim for a humidity level of 75% or less to avoid warping or peeling.
Choosing the Right Underlayment
Selecting the appropriate underlayment enhances comfort and reduces sound transmission. Foam underlayment offers cushioning and moisture resistance, while felt variants can provide added insulation. For areas prone to moisture, opt for a specialized underlayment designed for water resistance, ensuring the longevity of your vinyl flooring.
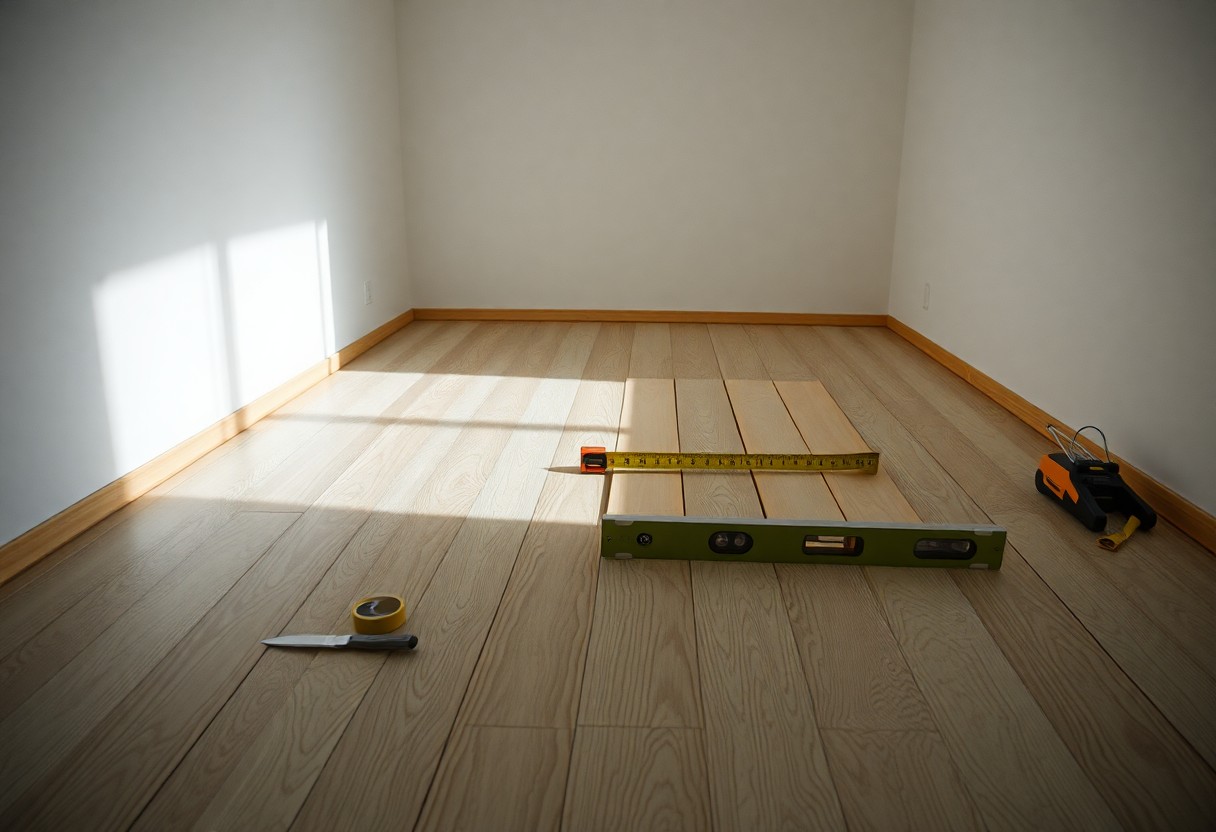
Tools and Materials
A successful installation requires the right tools: sharp utility knife, straight edge, measuring tape, and a tapping block for snug seams. Gather your vinyl planks or sheets, adhesive if used, and a roller for pressing down the flooring. Having everything on hand streamlines the process and minimizes interruptions.
Essential Tools and Materials for the DIY Installer
Before plunging into vinyl flooring installation, gather crucial tools and materials to ensure a smooth process. You’ll need items like measuring tapes, utility knives, and a flooring roller, along with adhesive, underlayment, and a straight edge. Having everything on hand saves time and enhances efficiency, allowing you to focus on achieving professional results.
Must-Have Tools for Vinyl Flooring
Your toolkit should include a few key items: a measuring tape to determine room dimensions, a utility knife for precise cuts, and a flooring roller to secure your vinyl. A straight edge helps achieve clean lines, while a jigsaw can be useful for intricate corners and edges. Each tool plays a pivotal role in ensuring your installation is both accurate and visually appealing.
Choosing the Right Vinyl Flooring Option
Selecting the appropriate vinyl flooring option involves considering your lifestyle, room usage, and aesthetic preferences. Vinyl flooring comes in various formats, including sheets, tiles, and planks, each offering unique benefits. For high-traffic areas, choose thicker options for durability, while for aesthetics, opt for styles that replicate natural materials like wood or stone.
An important factor in making your choice is the wear layer thickness, typically ranging from 6 mil to 20 mil. For example, a thicker wear layer provides enhanced durability and is better suited for homes with pets or children. Concurrently, explore various designs, such as luxury vinyl plank (LVP) for a hardwood look or vinyl tiles for easier replacement. Assessing your specific needs, including moisture resistance for bathrooms or kitchens, will guide you toward the best vinyl flooring selection for your home.
Preparing Your Space for Installation Success
Proper preparation of your installation space is important for achieving a smooth and long-lasting vinyl flooring result. Start by clearing the area of furniture and debris, allowing ample room to work. Ensure the room is well-ventilated to prevent moisture build-up, which can affect adhesive performance. Furthermore, time spent in this initial preparation phase can significantly enhance the overall quality of your flooring installation.
Subfloor Requirements and Preparation Techniques
Your subfloor must be clean, dry, and level to support vinyl flooring effectively. Inspect for any signs of damage or irregularities, such as cracks or protrusions, and address these issues before laying the new floor. If necessary, use a self-leveling compound to create a smooth surface. Ensure that any old flooring is removed and the subfloor is sanded down if it is uneven.
Climate and Environmental Factors to Consider
Climate impacts your vinyl flooring installation and performance, influencing expansion and contraction. Maintain indoor temperatures between 65°F and 85°F during installation; extreme temperatures can affect adhesive properties and vinyl behavior. Moisture levels in the air also play a role, particularly in areas prone to humidity. Monitor your installation environment for a stable climate to ensure optimal results.
- Indoor temperature should be consistently maintained.
- Humidity can weaken adhesives or cause vinyl to warp.
- Adequate acclimation time for vinyl is advised.
- Flooring should be stored in the area where it’s to be installed.
- Any fluctuations in climate should be minimized for better performance.
Your installation’s success hinges on specific climate factors. Vinyl flooring typically expands and contracts with temperature changes; therefore, if you live in an area with extreme temperature variations, consider installing an underlayment that can accommodate movement. Keep in mind that the moisture level in concrete subfloors should not exceed 3 pounds per 1000 square feet, as higher readings may lead to mold or damage. Proper acclimatization also means letting your vinyl acclimate in the installation area for at least 48 hours before beginning.
- Monitor moisture levels in your home.
- Extreme changes in temperature can lead to installation issues.
- Humidity should be controlled to prevent warping.
- Consider seasonal impacts on flooring performance.
- Any adjustments to climate settings prior to installation can enhance outcomes.
The Step-by-Step Installation Process Unveiled
Step-by-Step Installation Breakdown
| 1. Planning and Measuring Your Layout | Map out room dimensions and determine tile placement for optimal flow and coverage. |
| 2. Techniques for Cutting and Fitting Vinyl Tiles | Utilize precise cutting tools to ensure tiles fit snugly against walls and corners. |
| 3. Adhesion Methods: Glue Down vs. Click Lock | Select the appropriate installation method based on your space and preferences. |
Planning and Measuring Your Layout
Start by carefully measuring the room and sketching a layout to identify the best tile arrangement. Mark the location of doors, cabinets, and furniture to avoid unnecessary cuts and wastage. Use a chalk line to establish a straight reference point for laying tiles, ensuring a professional finish. This preparation phase sets the foundation for a smooth installation process.
Techniques for Cutting and Fitting Vinyl Tiles
Accurate cutting and fitting of vinyl tiles are crucial for a seamless look. Use a utility knife or a vinyl cutter to trim tiles, making sure to measure twice before each cut. For irregular shapes, create templates using cardboard to ensure a perfect fit. Always work from the center of the room outwards to maintain balance and symmetry in your design.
Utilizing a straight edge as a guide while cutting will enhance accuracy and reduce waste. For corners and edges, score the tile lightly before snapping it for a clean break. For specialized cuts around plumbing or electrical outlets, be precise with a jigsaw or hole saw. This attention to detail ensures that your tiles will fit together uniformly, contributing to an overall polished appearance.
Adhesion Methods: Glue Down vs. Click Lock
Selecting the right adhesion method can affect both the installation process and long-term durability. Glue-down installations require an adhesive spread evenly across the subfloor before laying tiles, which can provide excellent stability but may involve messy cleanup. Alternatively, click-lock systems offer easy installation without adhesive, allowing for more flexibility should you choose to reposition the flooring.
Understanding the pros and cons of each method will help in your decision-making. Glue down is often preferred for high-traffic areas due to its solid bond, while click-lock is ideal for DIY enthusiasts seeking quick and straightforward installation. The choice can also depend on subfloor condition—glue-down works well on uneven surfaces, while click-lock performs best on smooth, level floors. Evaluating your space and lifestyle will guide you to the most suitable option.
Finishing Touches: Sealing and Maintenance
Completing your vinyl flooring installation involves proper sealing and maintenance to ensure its longevity. Sealing protects your floors from moisture and dirt infiltration while enhancing their appearance. Regular maintenance keeps your floors looking new and prolongs their lifespan, making it necessary for your investment’s safeguard.
Proper Sealing Techniques for Longevity
Apply a high-quality sealant specifically designed for vinyl flooring to create a protective layer against wear and tear. Evenly distribute the sealant using a roller or brush, taking care to cover all edges and seams. Allow it to dry completely before walking on it, ensuring a durable finish that prevents staining and damage over time.
Maintenance Tips for Sustained Durability
Keep your vinyl flooring in top condition by regularly sweeping or vacuuming to remove debris. Utilize a damp mop with a gentle, pH-neutral cleaner for occasional deep cleaning, avoiding harsh chemicals that can damage the surface. Additionally, place felt pads under furniture legs to prevent scratches and scuffs. Knowing these tips can help maintain your floors’ pristine look and durability.
- Sweep or vacuum regularly to remove loose dirt.
- Damp mop with a suitable cleaner for deep cleaning.
- Use furniture pads to prevent scratches.
Regular maintenance minimizes wear and reinforces the sealant’s protective features. Schedule periodic cleaning to tackle deeper stains or any sticky residues promptly, ensuring hygiene and appearance. Avoiding excessive water exposure during cleaning also protects the seams from loosening. Knowing these strategies will help you enjoy your vinyl flooring for years to come.
- Follow a regular cleaning routine to avoid buildup.
- Repair any damage promptly to prevent further issues.
- Keep humidity levels stable to minimize warping.
Troubleshooting Common Installation Challenges
Throughout your vinyl flooring installation journey, challenges may arise that can hinder your progress. Identifying these issues early and knowing how to address them will save you time and frustration. From improper subfloor preparation to adhesive-related problems, being aware of potential pitfalls allows you to tweak your approach and achieve a successful result without redoing work.
Identifying Potential Installation Pitfalls
Common pitfalls in vinyl flooring installation include inadequate subfloor preparation, misalignment of planks, and failure to acclimate the flooring material. Inspect your subfloor for moisture or irregularities, as these can lead to problems like warping or adhesive failure. Misaligned planks not only disrupt aesthetics but can also create gaps over time, compromising your flooring’s integrity.
Solutions to Recurring Vinyl Flooring Issues
Address recurring vinyl flooring issues by ensuring a clean and level subfloor, acclimating the flooring beforehand, and using the right adhesives or installation method. Double-check measurements and use spacers for expansion gaps to prevent buckling. In case of visible seams or gaps, employ filler or seam adhesive to ensure a unified appearance.
Concrete or wooden subfloors should be entirely clean and dry, as moisture can lead to mold and adhesion problems. Invest in a leveling compound if your subfloor is uneven. When using glue-down vinyl, follow the manufacturer’s recommendations closely for adhesive application. Using a seam roller after installation can help bond seams effectively and eliminate gaps, enhancing durability and aesthetics. Addressing these issues promptly diminishes the likelihood of recurring problems and prolongs the life of your vinyl flooring.
Future-Proofing Your Vinyl Flooring Experience
Investing in vinyl flooring is more than just a choice for today; it’s about ensuring your space remains stylish and functional over time. By staying informed about advancements in flooring technology and design trends, you can extend the life and aesthetics of your vinyl flooring. Understanding how to maintain it and adapt with changing styles ensures your investment feels fresh for years to come.
Keeping Up with Trends in Vinyl Flooring
Trends in vinyl flooring evolve rapidly, influenced by changes in design preferences and advancements in material technology. You can keep your flooring relevant by following industry news, engaging with design communities, and exploring new patterns, textures, and colors that emerge seasonally. Regularly exploring the market will enable you to refresh your space while maintaining a cohesive look.
Selecting Options for Timeless Appeal
Choosing vinyl flooring that embodies timeless appeal involves selecting classic colors and patterns that transcend fleeting trends. Neutrals like beige, gray, and taupe tend to pair well with various styles, while natural wood and stone finishes maintain their charm and versatility. Additionally, opting for high-quality products with a durable wear layer ensures your flooring withstands the test of time, both in function and style.
For a truly timeless look, consider vinyl flooring with a natural wood or stone appearance, as these materials have long been favored in home design. Classic patterns such as herringbone or chevron can also create an elegant statement. Combining these aesthetic choices with durable options enhances both beauty and practicality, ensuring your vinyl flooring remains a stylish foundation for your home that suits evolving design preferences without requiring frequent updates.
