
This guide equips you with pro techniques for installing and maintaining vinyl floors, covering preparation, precise cutting, secure adhesion, and simple cleaning routines to extend wear and finish.
Selecting the Right Material: Key Factors for Durability
Choose vinyl rated for your traffic and moisture conditions, prioritizing wear-layer thickness and a stable core for long-term performance. This helps you avoid premature wear and costly replacements.
- Wear-layer thickness
- Core composition and stability
- Moisture resistance
- Manufacturer warranty
Assessing Wear Layer Thickness and Core Stability
Check wear-layer mils: 20+ for heavy use, 12-20 for busy homes, 6-12 for light traffic; confirm the core resists dents and moisture so you extend service life.
Choosing Between Rigid Core and Flexible Vinyl Options
Compare rigid-core LVP/LVT for dimensional stability and easy floating installs with flexible vinyl for softer feel and better subfloor conformity, then pick what suits your room and routine.
If your subfloor is uneven or you expect heavy impact, choose rigid core (SPC or WPC) for dent resistance and consistent seams; if you prefer warmth, quieter steps, and have a level subfloor, flexible vinyl may be a better fit.
Subfloor Preparation: How-to Create a Professional Foundation
Prepare the subfloor by confirming dryness, flatness, and solidity; use a straightedge to locate highs and lows, grind or patch as needed, and install underlayment or a vapor barrier per manufacturer tolerances.
Factors Influencing Moisture Barriers and Surface Leveling
Assess moisture, substrate and slope before choosing barrier and leveling method:
- Moisture source
- Substrate type
- Surface flatness
Assume that persistent dampness requires a professional vapor barrier and re-leveling.
Cleaning and Patching Existing Surfaces for Maximum Adhesion
Clean and patch old surfaces by removing adhesives, degreasing, filling holes with patch compound, then sand and vacuum to maximize adhesive contact for your vinyl installation.
Inspect the substrate for oils, coatings, or laitance; when you strip contaminants with solvents or mechanical abrasion, apply manufacturer-approved patching products, feather edges, allow full cure, and test adhesion before you lay the vinyl.
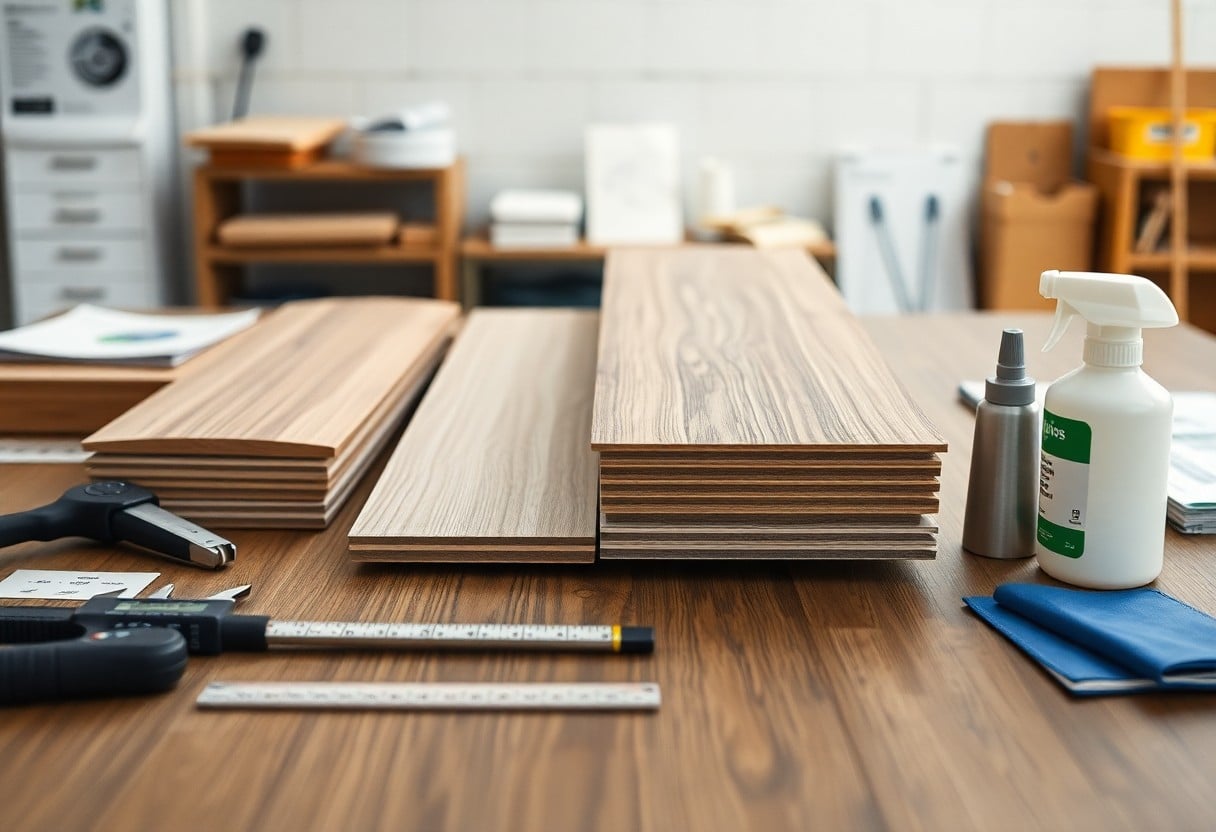
Essential Inventory: Professional Tips for Tools and Materials
You should assemble a compact kit of pro-grade tools and materials to keep installs fast and precise. The importants include measuring gear, cutting tools, tapping equipment, adhesives, seam rollers, underlayment, and a moisture meter.
- 25‑ft tape measure
- Utility knife + extra blades
- Straightedge / T‑square
- Vinyl cutter or jigsaw
- Pull bar and tapping block
- Seam roller and flooring roller
- Adhesive and trowel
- Underlayment and moisture meter
Must-Have Cutting, Measuring, and Tapping Equipment
Measure using a 25‑ft tape, T‑square, and straightedge; use a sharp utility knife or vinyl cutter, a jigsaw for curves, and finish seams with a tapping block and pull bar to fit pieces tight.
Selecting the Proper Underlayment for Sound and Comfort
Choose underlayment rated for vinyl to reduce noise, add cushion, and protect against minor subfloor imperfections; you should opt for 1-3mm foam or cork for floating installs, or heavier acoustic pads in multi‑unit buildings.
Consider moisture resistance and compression rating when selecting underlayment; you’ll want vapor barriers over concrete slabs and higher density materials under heavy foot traffic to prevent indentation and improve longevity.
Installation Guide: How-to Lay Vinyl Planks Like a Pro
Begin by confirming your subfloor is level, clean, and dry; acclimate planks per manufacturer instructions, snap a chalk line for your starting row, and plan cuts so end pieces exceed six inches for consistent pattern.
Establishing the First Row and Staggering Joint Patterns
Anchor your first row against the spacer line with the groove facing the wall, keep a consistent expansion gap, and stagger end joints at least six inches to prevent mirrored seams and distribute stress across the floor.
Techniques for Clicking and Locking Planks Securely
Angle each plank to engage the tongue, lower it slowly while you press forward, then tap the seams with a soft mallet or tapping block to lock; inspect joints as you go to catch misalignments.
Use your tapping block for long runs, your pull bar for final rows, and a dead-blow mallet for stubborn joints; clear debris from grooves, seat each lock fully, and backtrack to reseat any plank that shows a gap.
Expert Tips for Handling Complex Layouts and Edges
You map complex areas, dry-fit planks, and plan cuts before adhering; angle cuts and templates save time. This method reduces errors and delivers clean, professional edges.
- Use cardboard templates for irregular shapes
- Scribe pieces to fit tight against walls
- Cut allowance for expansion at all edges
Trimming Around Door Casings and Fixed Obstacles
Measure and scribe vinyl to door casings and pipes, trim with a sharp utility knife or coping saw, and test-fit pieces so you achieve tight, consistent gaps.
Installing Transition Strips and Baseboards for a Polished Look
Align transition strips at joins, select profiles to match height, and secure per manufacturer instructions while tucking baseboards to conceal expansion gaps.
Choose transition profiles that match vinyl thickness and traffic, cut strips slightly shorter for end caps, and fasten with adhesive or screws into the substrate; leave the recommended expansion gap at walls, sand and caulk baseboard joints, pre-drill for finish nails, and touch up paint for a refined finish.
Maintenance Mastery: How-to Preserve Your Investment
Preserve your vinyl investment by scheduling routine cleaning, using felt pads on furniture, and addressing spills immediately; inspect seams and edges regularly so you catch lifting or gaps early.
Daily Cleaning Tips and Recommended Chemical Solutions
Use daily dry-dusting and gentle damp mopping, and choose pH-neutral cleaners diluted per label.
- Microfiber dust mop
- pH-neutral cleaner, diluted
- Avoid bleach, ammonia, abrasive pads
Knowing that this routine prevents buildup, scratches, and finish dulling.
Environmental Factors to Manage for Long-Term Surface Beauty
Control indoor humidity and temperature, limit direct sunlight, and place entry mats so you cut tracked grit.
- Keep 35-65% humidity
- Install UV-filtering shades
- Use low-profile rugs in walkways
The measures help preserve color and finish.
Maintain stable indoor climate control, manage sunlight exposure, and reduce moisture sources to prevent cupping and discoloration.
- Use a hygrometer to monitor humidity
- Apply window film or blinds to block UV
- Check vents and plumbing near flooring
The combined steps extend lifespan and keep appearance close to showroom condition.
Conclusion
To wrap up, you can install vinyl like a pro by prepping the subfloor, following manufacturer instructions, using proper adhesives, and maintaining floors with gentle cleaners, routine sweeping, and prompt repairs to keep your vinyl durable and attractive.
