
Many homeowners are discovering the benefits of dry back vinyl flooring, not only for its durability but also for its stylish appeal. With this guide, you’ll learn the imperative steps needed to successfully install your own vinyl flooring, providing a beautiful and functional foundation for your home. Whether you’re a seasoned DIY enthusiast or a beginner, each step is clearly laid out to empower you in achieving professional results. Get ready to transform your space with confidence and ease!
Preparing Your Space for Vinyl Flooring Success
Creating the perfect environment for your vinyl flooring installation ensures a more seamless and efficient process. Begin by removing any existing flooring, furniture, and obstructions from the area. Thoroughly clean and inspect the space for any damage or irregularities that may interfere with the placement of your new vinyl. Keeping your workspace organized not only enhances safety but also streamlines your installation efforts, allowing you to focus on achieving a beautiful finish.
Assessing the Subfloor Conditions
A smooth, clean subfloor is imperative for a successful installation of your vinyl flooring. Inspect for any signs of moisture, cracks, or damage that could affect the final result. Ensure the subfloor is level, as uneven surfaces can lead to problems down the line. If any issues arise, take the necessary steps to repair or replace the subfloor before moving forward.
Gathering Essential Tools and Materials
Before plunging into your installation, gather all vital tools and materials. You’ll need a utility knife, straight edge, measuring tape, square, adhesive, roller, and a few other handy tools to ensure your installation goes smoothly. Additionally, ensure you have extra vinyl flooring planks on hand in case of mistakes or repairs in the future.
Gathering the right tools can significantly affect your installation efficiency and success. Invest in high-quality adhesive and a roller specific for vinyl flooring to ensure the best bond and finish. A square is invaluable for keeping your cuts accurate and your lines straight. If you find your workspace cluttered, consider using a tool belt or a small cart to keep everything organized and within reach. A small level can help you identify minor floor imperfections that should be addressed before installation begins. By preparing and equipping yourself adequately, you can focus on achieving a professional-quality finish in your new vinyl floor.
Selecting the Right Dry Back Vinyl Flooring
Choosing the perfect dry back vinyl flooring involves understanding your specific needs, preferences, and the demands of your space. You’ll want a product that not only complements your home’s aesthetics but also stands up to heavy foot traffic, moisture, and wear over time. An informed selection can enhance both the appearance and functionality of your interiors.
Key Features to Consider: Thickness, Composition, and Design
Several key features should guide your selection process when choosing dry back vinyl flooring to ensure longevity, comfort, and style.
- Thickness: Ranges from 1mm to 5mm; thicker options offer better cushioning and durability.
- Composition: Usually made from PVC, consider layers (wear, design, and backing) for strength and moisture resistance.
- Design Options: Available in various finishes, from traditional wood-look to modern stone designs.
- Moisture Resistance: Opt for products specifically designed for wet areas, like kitchens and bathrooms.
- Ease of Maintenance: Check cleaning requirements; some options are easier to maintain than others.
Perceiving the right combination of these features can significantly influence your overall satisfaction and use of the flooring.
Evaluating Styles and Patterns that Suit Your Home
Your home’s design should influence your choice of vinyl flooring. From rustic farmhouse themes to sleek, modern aesthetics, the style you choose will set the tone for your space. Classic wood grains, chic tiles, or bold patterns should seamlessly blend with your existing decor for a cohesive look. Consider your furniture, wall colors, and overall ambiance to select a pattern that adds depth and character to your home.
Explore various options, such as herringbone or plank layouts, to see which design complements your furniture and architecture. Consulting sample swatches can be helpful, allowing you to visualize how the flooring interacts with your light sources and color palettes for a harmonious feel. You may also want to consider the size of the room; larger patterns can make a small space feel cramped, while smaller designs can add warmth and coziness, making it feel more inviting.
Mastering the Installation Technique
Navigating the installation technique for dry back vinyl flooring requires a blend of precision and strategic planning. Focusing on each step ensures that your flooring not only looks impeccable but also stands the test of time. This section will simplify the process into digestible steps, allowing you to execute the installation methodically and confidently.
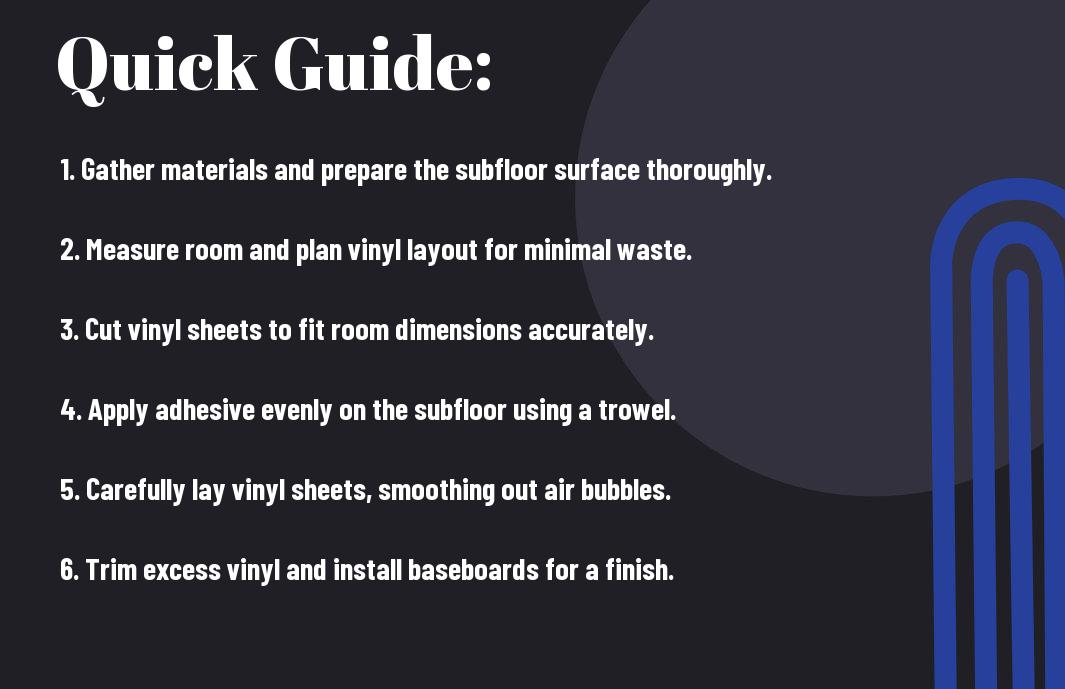
Step-by-Step Method: Laying the Vinyl Sheets
| 1. Prepare the Subfloor | Ensure your subfloor is clean, dry, and level. Remove any imperfections before installation. |
| 2. Measure and Cut Vinyl Sheets | Accurately measure your area and cut vinyl sheets to size, leaving a small gap around walls. |
| 3. Apply Adhesive | Evenly spread adhesive onto the subfloor using a notched trowel, following manufacturer’s guidelines. |
| 4. Lay the Sheets | Carefully place the vinyl sheets on the adhesive, starting from one corner and moving across. |
| 5. Roll the Floor | Use a floor roller to eliminate air bubbles and ensure the sheets adhere solidly to the adhesive. |
Sealing and Securing: Ensuring a Flawless Finish
Sealing your vinyl flooring is vital to achieving a polished, professional appearance. Apply a suitable vinyl floor sealer along seams and edges to create a barrier against moisture and grime. This final step not only protects your floors but also enhances longevity, maintaining the beauty of your installation for years.
After you’ve laid the vinyl sheets, taking the time to seal edges and seams is paramount. Use a quality sealant that bonds well with vinyl, ensuring you apply it evenly along all joints. This will prevent potential lifting in high-traffic areas and safeguard against spills that could seep beneath the flooring. Allow the sealant to cure completely, following the manufacturer’s instructions, to guarantee a strong and lasting finish. Your meticulous attention to detail in this phase will pay off in the form of durable and aesthetically pleasing flooring.
Post-Installation Care and Maintenance
Proper care and maintenance post-installation can significantly extend the lifespan of your dry back vinyl flooring. Consistent cleaning routines and protective measures ensure your flooring maintains its aesthetic appeal while being resilient against wear. Following these simple steps will help you keep your investment looking great for years to come.
Cleaning Regimens for Long-Lasting Durability
To keep your flooring in optimal condition, establish a regular cleaning schedule. Utilize a soft broom or vacuum to remove dirt and debris, followed by damp mopping with a gentle cleaner specifically formulated for vinyl floors. Avoid harsh chemicals that can damage the surface, and always follow the manufacturer’s guidelines for maintenance and cleaning to preserve your flooring’s finish.
Preventing Common Issues: Tips for Everyday Protection
Protecting your vinyl flooring from everyday wear and tear is crucial to maintaining its look and functionality. Use area rugs in high-traffic zones, ensure furniture legs have felt pads, and avoid dragging objects across the surface. Regularly inspect for signs of damage and address any scratches or dents promptly to prevent further issues.
- Use area rugs to cover high-traffic areas.
- Ensure furniture legs are equipped with felt pads to avoid dents.
- Clean spills immediately to prevent stains.
- Regularly inspect for scratches or damage and address them promptly.
- Recognizing potential issues early can save you from costly repairs later.
Understanding how to protect your dry back vinyl flooring from common issues will not only enhance its longevity but also keep your home looking polished. Avoiding footwear with hard soles indoors can dramatically reduce surface scratches. Additionally, using a humidity-controlled environment can prevent buckling in areas prone to moisture.
- Limit direct sunlight exposure to prevent fading.
- Clean spills as soon as they occur to maintain the finish.
- Keep pet nails trimmed to minimize scratches.
- Implement routine inspections to catch small issues before they escalate.
- Recognizing these preventive measures will help ensure your flooring looks great year after year.
Transforming Your Space: Visualizing the Impact
Visualizing the transformation that dry back vinyl flooring can bring to your home is an exciting part of the DIY installation journey. This type of flooring mimics natural materials like wood and stone while offering a modern aesthetic that enhances your interior. Picture your once dull rooms coming to life with fresh colors and textures, creating a sense of warmth and style that complements your personal decor. By thoughtfully selecting your flooring, you have the opportunity to redefine your space and make it distinctly your own.
Before-and-After Transformations: Inspiration for Homeowners
Before-and-after transformations serve as powerful inspiration for your flooring project. Many homeowners have documented their experiences, showcasing how a simple flooring change can radically alter the look and feel of a room. These visual narratives illustrate the potential of dry back vinyl flooring to seamlessly update your space, providing a stunning contrast between dated interiors and fresh, modern aesthetics. Use these examples to visualize how your rooms could be refreshed and invigorated with new flooring.
Budgeting for a DIY Project: How to Calculate Your Total Costs
Calculating the total costs of your DIY flooring project empowers you to make informed decisions and stay within your budget. First, determine the square footage of the area you plan to cover and obtain material estimates based on this measurement. Include costs for adhesives, tools, and any additional supplies you might need. Remember to factor in potential contingencies, such as subfloor repairs or installation errors, which could add to your costs. Having a clear budget ensures your project fulfills your vision without financial surprises.
To effectively calculate your total costs, start by measuring the dimensions of your project area, as this will guide you in selecting the appropriate amount of vinyl planking. Most vinyl flooring comes in boxes that cover a specific square footage, so knowing your total size helps minimize waste and under-purchasing. Additionally, think about the tools you’ll need—if you don’t already own them, including those costs can ensure a more accurate budget. Various factors, such as local sales tax and potential fees for delivery, should also be included to provide a comprehensive estimate. By outlining all these elements, you’re better equipped to plan and execute your DIY project successfully.
Final Words
Following this step-by-step guide, you have equipped yourself with the knowledge to successfully install dry back vinyl flooring in your home. By carefully preparing your space, selecting the right materials, and adhering to the outlined techniques, you can achieve a durable and aesthetically pleasing floor. Embrace the DIY spirit, and enjoy the satisfaction of transforming your living space with your own hands. With patience and attention to detail, you’ll be well on your way to a stylish and functional floor that enhances your home’s value.
